Appearance
Modeling with JoinedWorkz Studio
JoinedWorkz Studio is the primary tool for working with CMN and profile models. It is based on the Eclipse RCP platform and adds:
- editors for CMN (
.cmn) and profile (.profil) files, - validation and navigation for models,
- integration with the JoinedWorkz generators.
This page shows how to use the Studio for modeling and generation.
For installation and licensing, see:
1. Overview and prerequisites
JoinedWorkz Studio is distributed as a self-contained application. It includes its own JRE, and is configured to use that JRE by default. You do not have to install or configure a separate Java runtime to get started.
You only need to configure an external JDK/JRE if:
- you want to use a different Java version than the bundled one, or
- you have very specific tooling requirements.
Before you start modeling, you should have:
JoinedWorkz Studio installed and started at least once,
a Maven project that uses JoinedWorkz (for example
joinedworkz-quickstartor your own project with amodel/directory),basic familiarity with the concepts in:
- Modeling overview
- Model file structure
- CMN reference (optional, for details)
2. First start and workspace selection
When you start JoinedWorkz Studio for the first time, it asks you to select a workspace – a directory where it stores:
- workspace-specific metadata (Eclipse workspace internals),
- local preferences and view layouts,
- references to projects you import.
You can:
- choose any directory you like, and
- have multiple workspaces (for example one for JoinedWorkz examples and one for your own projects).
Tip: It is often convenient to use a dedicated workspace for JoinedWorkz projects, separate from other Eclipse-based tools.
After selecting a workspace and confirming, Studio starts with an empty workbench.

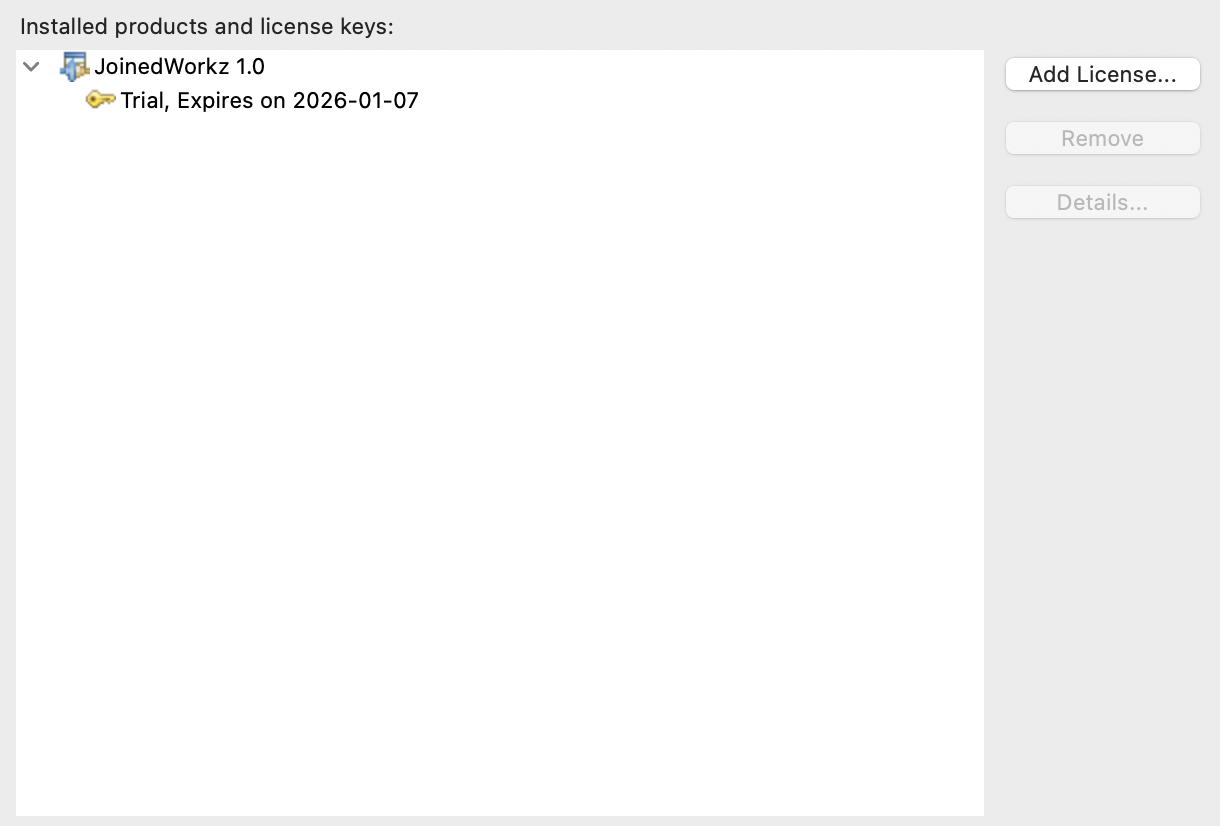
3. Adding a license
After the first start, Studio will open a license dialog. The typical workflow is:
- Download a trial license file from the JoinedWorkz website.
- In Studio, use “Add License…” in the license dialog.
- Select the downloaded license file.
- Confirm. The license is stored under your user directory in
.joinedsystems/joinedworkz/license.
Key points:
- A trial license is fully functional but has an expiry date.
- You do not have to paste a key; Studio works with the license file.
- For a full license or support, contact the author as described on the JoinedWorkz website.
Licenses are independent of the workspace and remain valid when you:
- open a different workspace, or
- update JoinedWorkz Studio to a newer version.
4. Importing an existing Maven project
The usual starting point is an existing Maven project that already:
- uses JoinedWorkz (for example via
cmn-maven-plugin), and - contains CMN models in a
model/directory.
To import such a project into Studio:
- Choose File → Import… → Maven.
- Select Existing Maven Projects.
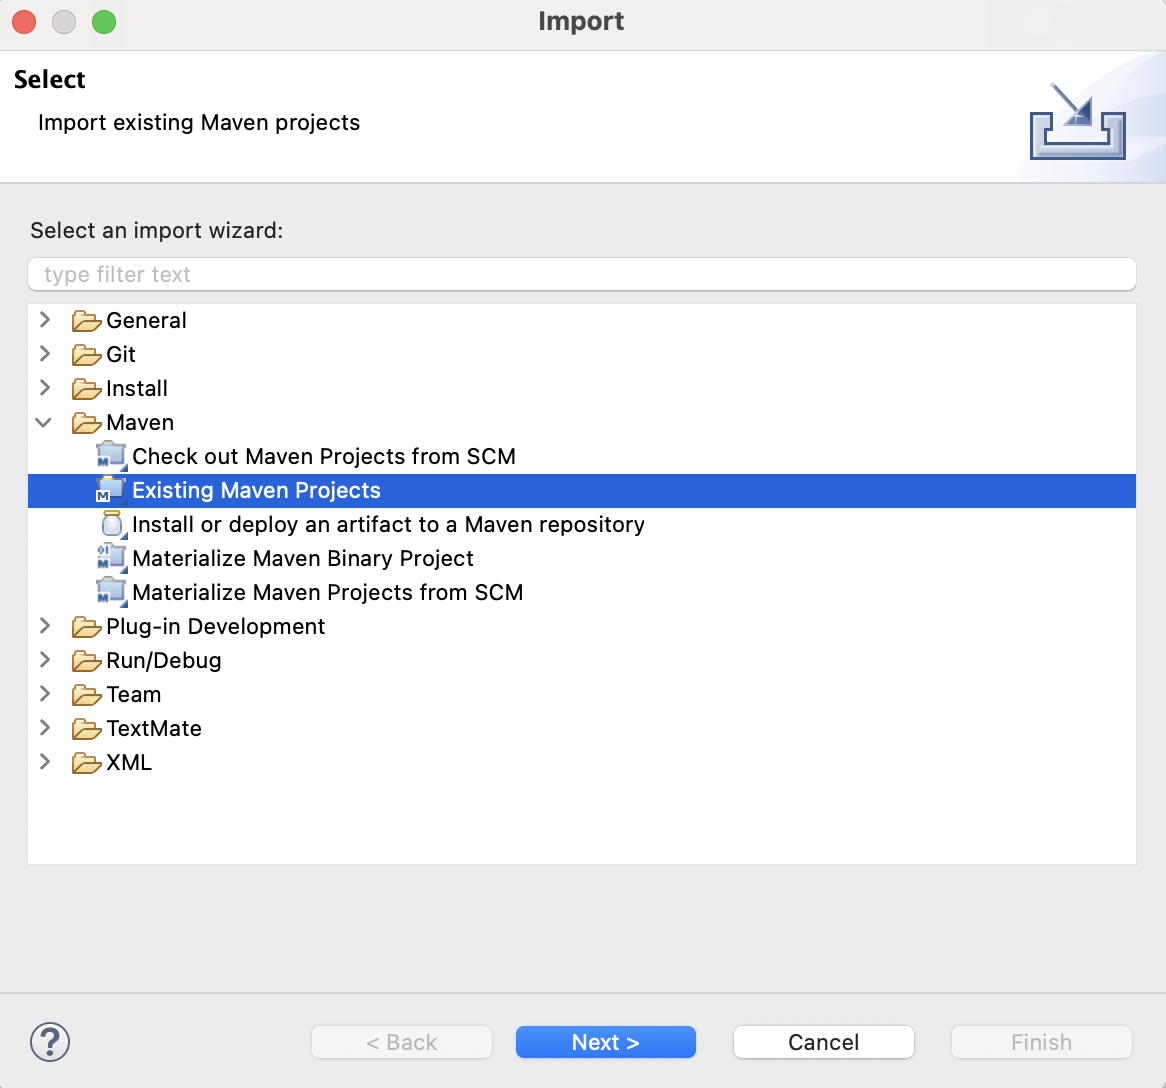
- Choose the root directory of your Maven project (for example the root of
joinedworkz-quickstart). - Select the modules you want to import and finish.
After import you should see:
- your modules in the Package Explorer,
- a
model/directory in the module that contains CMN files, joinedworkz.properties(if present) as a normal text file.
Note: The Maven plugin (
cmn-maven-plugin) in the project POM controls generation in Maven builds. JoinedWorkz Studio uses its own generation trigger, described later in this page.

5. Key views: Package Explorer, Problems, Properties, Console
Once the project is imported, the main views for modeling are:
5.1 Package Explorer
The Package Explorer shows:
- your Maven modules,
- the
model/directories with CMN and profile files, - other resources such as
joinedworkz.properties.
You typically:
- open CMN and profile files from here,
- run context actions (e.g. generate) on files, folders or projects.
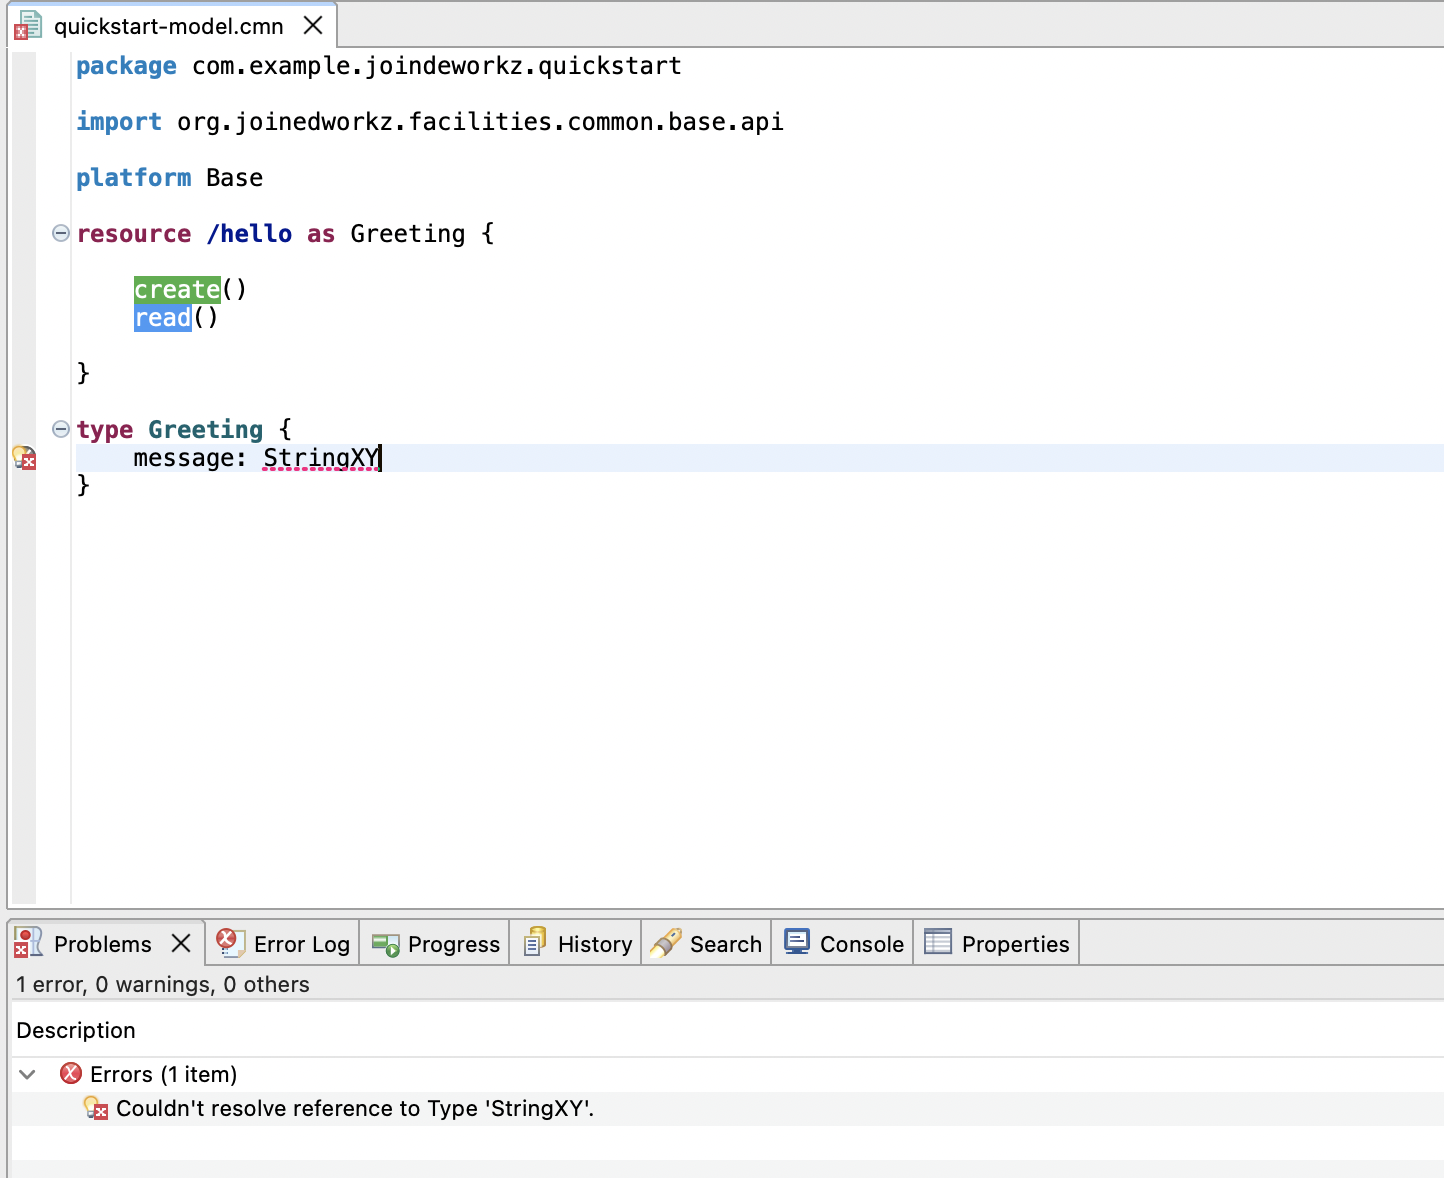
5.2 Problems view
The Problems view lists:
- syntax errors in CMN / profile files,
- validation errors and warnings from the modelling layer,
- problems reported by generators (if mapped to markers).
From this view you can:
- double-click a problem to jump directly to the position in the editor,
- filter by severity (error/warning/info) or by resource.
5.3 Properties view
The Properties view shows additional properties for the currently selected model element, for example:
- properties contributed by platforms (e.g.
tableName,columnName,javaType,format), - stereotype information.
It is especially useful when:
- you want to inspect platform-specific properties,
- or debug why a generator made a certain decision.
5.4 Console(s)
The Console view hosts different consoles, for example:
- Maven build output,
- the JoinedWorkz generator console (if you run generation from Studio),
- other tool-specific consoles.
When you run generation from Studio you typically see:
- which cartridges are executed,
- which models are processed,
- which outlets are used,
- and any error messages from generators.

6. CMN and profile editors
JoinedWorkz Studio provides editors for:
- CMN (
.cmn) – canonical model notation, - profile (
.profil) – platform profiles and facilities.
They behave similarly, with some DSL-specific features.
6.1 Syntax highlighting
The editors provide custom syntax highlighting for:
- header elements (layer,
package,import,platform), - content keywords (
type,enum,resource,component,application,stereotype,platform,cartridge,outlet, …), - aliases and
asusage, - layer identifiers,
- stereotype annotations (
<entity>,<key>, …), - alias prefixes (
shared::DateTime,core::Id, …).
This makes it easier to:
- visually distinguish header from content,
- recognise references to types in other packages,
- see where layers and platforms are declared.
6.2 Code completion
The editors offer code completion (typically via Ctrl+Space) for:
- keywords (
package,import,platform,resource,type, …), - known packages for imports,
- known stereotypes for
<...>annotations, - method types in resource bodies,
- known types when defining fields or identifiers.
Examples:
- After typing
type<you may get suggestions for stereotypes such asentity,projection,collection. - After
import org.joinedworkz.completion can suggest available facilities and profiles.
6.3 Validation
Validation happens on several levels:
- Syntax checks during typing and on save,
- model-level checks (for example unknown type references, invalid cardinalities),
- platform-specific checks in cartridges (for example missing required properties for SpringBoot).
Errors and warnings appear as:
- markers in the editor (icons in the left margin),
- entries in the Problems view.
You can:
- hover over markers in the editor for a short explanation,
- double-click problems to navigate directly to the problematic element.
7. Typical modeling workflow
A common modeling workflow in JoinedWorkz Studio looks like this:
Open or create a model file
- In the Package Explorer, create a new file under
model/, for examplecustomer.cmn, or open an existing file.
- In the Package Explorer, create a new file under
Define the header
- Choose a layer (
core,api,backend, …), - define the
packagename, - import required base models and profiles,
- set the
platform(e.g.Base,Java,SpringBoot).
- Choose a layer (
Model types, APIs, components, applications
- Use the editor to define simple and complex types, resources, components and applications,
- rely on completion and validation to catch errors early.
Fix validation errors
- Check the Problems view,
- navigate to each problem and adjust the model.
Generate artefacts
- Use the generation options (see next section) to run the generators.
- Inspect the output in your project structure.
Iterate
- Adjust the model,
- regenerate,
- repeat until the model and generated artefacts match your intention.
For the domain-specific details of each model element, see:
8. Generating from JoinedWorkz Studio
JoinedWorkz Studio can trigger generation independently of Maven. This is useful when:
- you want quick feedback during modeling,
- you do not want to run a full Maven build after every change.
8.1 Triggering generation
Depending on your Studio version and configuration, you can typically:
- generate for a single file (just by saving the file or via editor context menu),
- generate for a project (via Package Explorer context menu),
- generate via a main menu entry (for example JoinedWorkz → Generate) or a toolbar button.
Common patterns:
- Right-click on a CMN file or the
modelfolder and choose a generate command. - Right-click on the project in the Package Explorer and generate for the entire project.
During generation:
- the parser reads all relevant CMN / profile files,
- the model is transformed,
- the platform’s cartridges are executed,
- outlets and
joinedworkz.propertiesdetermine the output locations.
8.2 Generator console
While generation runs, the JoinedWorkz generator console shows:
- which model files are processed,
- which platform is used,
- which cartridges run (
DiagramCartridge,OpenApiCartridge, SpringBoot cartridges, …), - any warnings or errors coming from the generation process.
If generation fails, this console is usually the first place to look.

9. Handling errors during generation
Errors during generation typically fall into three categories:
Model/DSL errors
- Example: unknown type, invalid resource definition, missing platform.
- Usually reported as Problems and shown directly in the editor.
- Fix the model and try again.
Platform / cartridge errors
- Example: missing required property for a specific platform, incompatible stereotype usage for a platform.
- Often reported in the generator console, sometimes also as markers.
- Check the error message and adjust the model or platform configuration.
I/O & outlet errors
- Example: output directory not writable, invalid path configuration in
joinedworkz.properties. - Error messages usually mention the outlet name and target directory.
- Adjust
joinedworkz.propertiesor filesystem permissions and retry.
- Example: output directory not writable, invalid path configuration in
General approach:
- first check the Problems view for obvious model errors,
- then the generator console for platform/outlet details,
- fix issues, save and rerun generation.
10. Updates and maintenance
To keep JoinedWorkz Studio up to date, use:
- Help → Check for Updates…
The update mechanism:
- checks the configured update sites,
- installs available updates for JoinedWorkz features and plugins.
Important:
- License files are stored under your user directory and are not lost when you update Studio or switch workspaces.
- After an update, you can usually continue working with your existing workspace and projects.

11. Tips and shortcuts
Some small hints that help in daily work:
Code completion
UseCtrl+Spacefrequently to discover available keywords, types, stereotypes and method types.Navigation via Problems view
Double-click a problem to jump directly to the affected model element.Workspace organisation
Consider one workspace per logical set of JoinedWorkz projects to keep things tidy.Use the examples
Clone and importjoinedworkz-quickstartand other public example projects to see working CMN models and generation setups.
For more advanced project setups, see: